The Big Application Event
Salesforce have recently made a big thing of components that make up a page. They would like us to create really modular components that build up together and work across the page. key to making this work is Events and the document and approach is at best a bit inconsistent and at worst completely frustrating.
The first hurdle is choosing between component and application events. Events within one ‘self-contained’ lightning component is a component event (so a large component with linked parts). Everything else is an application component.
This example does a simple message between two different components, as shown below so that string can be entered in one lightning component to then show up on the other lightning component. Get this right and you can expand wider.

The bits that make this up are:
- A sender component with a simple text box and ‘Send’ button
- A receiver component that builds the text up as it arrives
- An event component that is used to send the application event with the payload
- Code to do the sending of the event
- Code to receive the code
All this to get a string from the left of the screen to the right !!
The basics
To get going :
- Create a lightning component called Sender and tick ‘Lightning Page’
- Create a lightning component called Receiver and tick ‘Lightning Page’
- From Setup, search in the Quick Find box for ‘Lightning App Builder’
- Click ‘New’ and ‘App Page’, then a label and say a two column layout
- You should now see your two Custom ‘Sender’ and ‘Receiver’ which can be dragged to the canvas. Save and activate your app page.
The basics are in place we just need to work on the code.
Sender
Open up the Sender component and add in a simple text box and button in a SLDS Card.
<article class="slds-card">
<div class="slds-card__header slds-grid">
<header class="slds-media slds-media_center slds-has-flexi-truncate">
<div class="slds-media__body">
<h2>
<span class="slds-text-heading_small">Sender</span>
</h2>
</div>
</header>
</div>
<div>
<lightning:input type="text" label="Message" class="slds-input" value="{!v.message}" placeholder="Enter your message..." /><br/>
<lightning:button class="slds-button slds-button_brand" onclick="{!c.sendMessage}">Send</lightning:button>
</div>
</article>
This code includes the message attribute and also the onclick method to do the sending of the message. Add the attribute to store the message being typed in the text box. I admire the ease of this – create an attribute to hold the string of a text box by simply addingvalue=”{!v.message}” to the input box.
<aura:attribute name="message" type="String" default=""/>
A simple function in the controller:
sendMessage : function(component, event, helper) {
var thisMessage = component.get("v.message");
console.log(thisMessage);
}
Will now send to the console the message entered when the button is clicked.
Receiver
Our Receiver is similar, the following code gets a SLDC card setup and then outputs the receivedMessage attribute:
<article class="slds-card">
<div class="slds-card__header slds-grid">
<header class="slds-media slds-media_center slds-has-flexi-truncate">
<div class="slds-media__body">
<h2>
<span class="slds-text-heading_small">Receiver</span>
</h2>
</div>
</header>
</div>
<div>
<lightning:formattedText value="{!v.receivedMessages}"/>
</div>
</article>
Add the attribute to the top of the code
<aura:attribute name="receivedMessages" type="String" default="Messages will appear here"/>
Application Event
Now for the event hook-up.
The first step is to build the event which is actually another lightning file.
- From the Developer Console, File, New Lightning Event
- Enter EvntMessage
- Add <aura:attribute name=”message” type=”string”/> as the event payload
The final version is
<aura:event type="APPLICATION" description="Event template" >
<aura:attribute name="message" type="string"/>
</aura:event>

So we now have an event called EntMessage that we can pass a parameter called message that is of a string type.
On the sending side we register to send the event
<aura:registerEvent name="x' type="c:EvntMessage"/>
on the receiver side we have a handler to deal with the message
<aura:handler event="c:EvntMessage" action="{!c.handleMessage}"/>
I think this is where the documentation and consistency breaks down (although the online help does try and be clear – see https://developer.salesforce.com/docs/atlas.en-us.lightning.meta/lightning/events_application_fire.htm)
On the registerEvent the name attribute is not used but bizarrely is mandatory.
It gets worse, on the handler you could set a name attribute but this renders the handler useless (see https://developer.salesforce.com/docs/atlas.en-us.lightning.meta/lightning/events_application_handling.htm).
This is almost the opposite to component events which adds to the confusion.
Event Firing
So going back to our sending side add:
<aura:registerEvent name="x' type="c:EvntMessage"/>allows this component to fire the c:EvntMessage event.
The code for sending an application event is completely different to a component event and is :
var appEvent = $A.get("e.c:EvntMessage");
appEvent.setParams({ "message" : thisMessage });
appEvent.fire();
The e.c:EvntMessage is a bit of an odd combination (let’s not get into namespaces) but think of it as e for event and c.EvntMessage being your event. Then the ‘payload’ for the event is added.
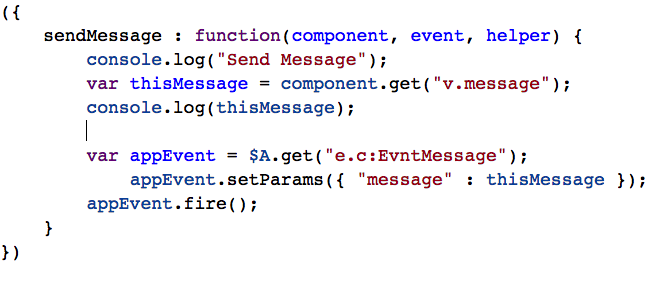
Our controller looks like this:

Event Receiving
On the receiver code add
<aura:handler event="c:EvntMessage" action="{!c.handleMessage}"/>
allows the component to say ‘let me know if any of the c:EvntMessages are fired, when they do run my controller handleMessage function.’
Even simpler on the receiver in the handleMessage function:
var message = event.getParam("message");
Then we can get the current messages and add this on:
var currentmessage = component.get('v.receivedMessages');
currentmessage = currentmessage + '\r' + message;
component.set('v.receivedMessages',currentmessage);

Everything is now hooked up so a message from one component will appear on the other.


