Simple Project – Post 2 – Flow Navigation
This is the first of short set of posts that will build in to a working example. The overall example will allow the user to select a document from a static resource and then send the static resource as an attachment on an email. This will demonstrate the following:
- How to list the documents in a static resource
- How to present a datatable to the user with a select to move the next screen of the flow
- How to attach a specific static resource to an email and send
Post 1 covered getting the list of documents from the static resource and we are returning to the lwc a JSON object that looks like this:
[
{"document" : "Document 1.pdf"},
{"document" : "Document 2.pdf"},
{"document" : "Document 3.pdf"},
{"document" : "Document 4.pdf"},
{"document" : "Document 5.pdf"}
]
So we are ready to create a fairly simple LWC called ‘selectDataTable’. This has a template file as follows:
<template>
  <lightning-datatable
    data={data}
    columns={columns}
    key-field="document"
    hide-checkbox-column="true"
    show-row-number-column="true"
    onrowaction={callRowAction}
  ></lightning-datatable>
</template>
Our javascript file is:
import { LightningElement, api, wire } from "lwc";
import { FlowNavigationNextEvent } from "lightning/flowSupport";
import getStaticDescription from "@salesforce/apex/staticController.getStaticDescription";

const columns = [
  {
    label: "Document",
    fieldName: "document"
  },
  {
    type: "button",
    initialWidth: 200,
    typeAttributes: {
      label: "Select",
      name: "Select",
      iconPosition: "left",
      iconName: "utility:preview",
      variant: "Brand"
    }
  }
];

export default class SelectDataTable extends LightningElement {
  data;
  columns = columns;

  @api
  selectedDocument;

  @wire(getStaticDescription)
  wireGetStaticDescription(result) {
    if (result.data) {
      const jsonObject = JSON.parse(result.data);
      this.data = jsonObject;

    }
    if (result.error) {
      console.log(result.error);
    }
  }

  callRowAction(event) {
    const rowDetails = event.detail.row;
    const actionName = event.detail.action.name;
    this.selectedDocument = rowDetails.document;
    const navigateNextEvent = new FlowNavigationNextEvent();
    this.dispatchEvent(navigateNextEvent);
  }
}
and finally the meta file is:
<?xml version="1.0" encoding="UTF-8"?>
<LightningComponentBundle xmlns="http://soap.sforce.com/2006/04/metadata">
    <apiVersion>56.0</apiVersion>
    <isExposed>true</isExposed>
    <targets>
        <target>lightning__FlowScreen</target>
    </targets>
    <targetConfigs>
        <targetConfig targets="lightning__FlowScreen">
            <property name="selectedDocument" type="String" label="selectedDocument" description="Selected Document"/>
        </targetConfig>
    </targetConfigs>
</LightningComponentBundle>
Let’s break this down a bit. We need a table with one column where we will show the name of the file and then a column with a button on each row. So we set up the columns as below
const columns = [
  {
    label: "Document",
    fieldName: "document"
  },
  {
    type: "button",
    initialWidth: 200,
    typeAttributes: {
      label: "Select",
      name: "Select",
      iconPosition: "left",
      iconName: "utility:preview",
      variant: "Brand"
    }
  }
];
and then add the columns to the table and set up the data to display:
 data;
  columns = columns;
We will link to our apex controller that we have created and when we get data back update our datatable. Because we set up our json in the right format we can simply connect the datatable to data:
  import getStaticDescription from "@salesforce/apex/staticController.getStaticDescription";

  @wire(getStaticDescription)
  wireGetStaticDescription(result) {
    if (result.data) {
      const jsonObject = JSON.parse(result.data);
      this.data = jsonObject;
    }
    if (result.error) {
      console.log(result.error);
    }
  }
The last section will be to capture the button press and then record what document we are interested in and then move to the next flow screen:
  import { FlowNavigationNextEvent } from "lightning/flowSupport";

  @api
  selectedDocument;


  callRowAction(event) {
    const rowDetails = event.detail.row;
    const actionName = event.detail.action.name;
    this.selectedDocument = rowDetails.document;
    const navigateNextEvent = new FlowNavigationNextEvent();
    this.dispatchEvent(navigateNextEvent);
  }
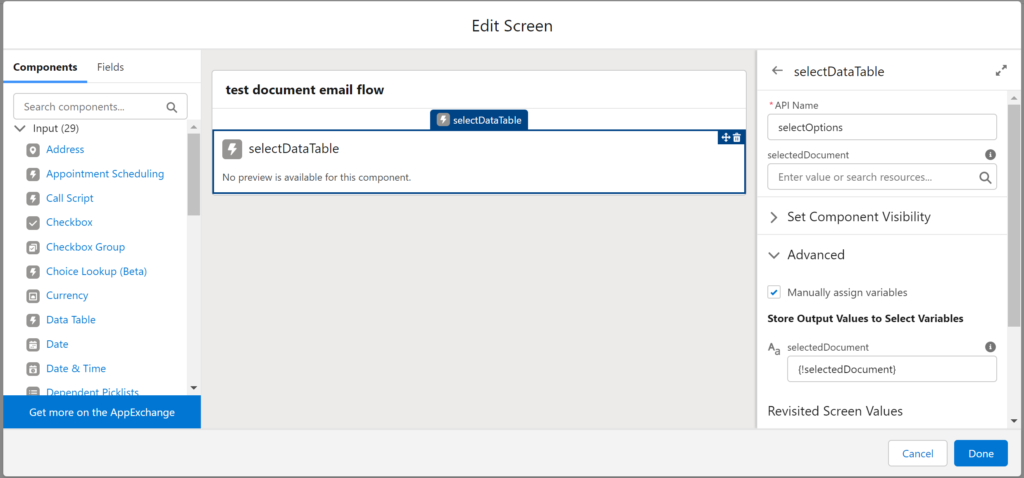
We can now create a new flow and add the lwc a screen element (remove the footer as the datatable will do the next flow screen action). We are passing the selectedDocument back from the lwc to the flow and storing in a veriable :

and then when we run the actual flow we will get:


